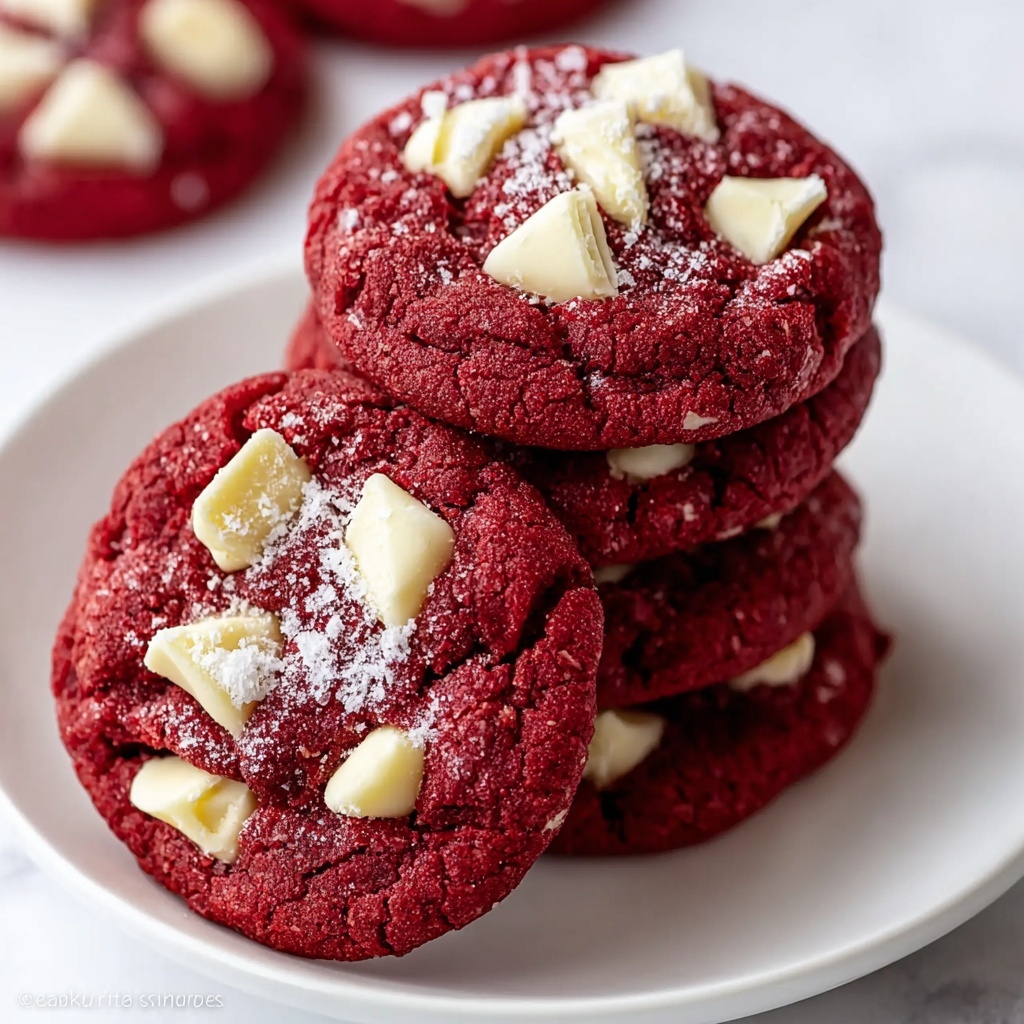
If you have a sweet tooth and love vibrant treats, you are going to adore this Red Velvet Cookies With White Chocolate Chunks Recipe. These cookies perfectly blend the deep, velvety flavors of classic red velvet cake with generous bursts of creamy white chocolate chunks in every bite. They’re soft, rich, and irresistible, making them an instant favorite whether you’re baking for a special occasion or just because you deserve something truly delicious.
Ingredients You’ll Need
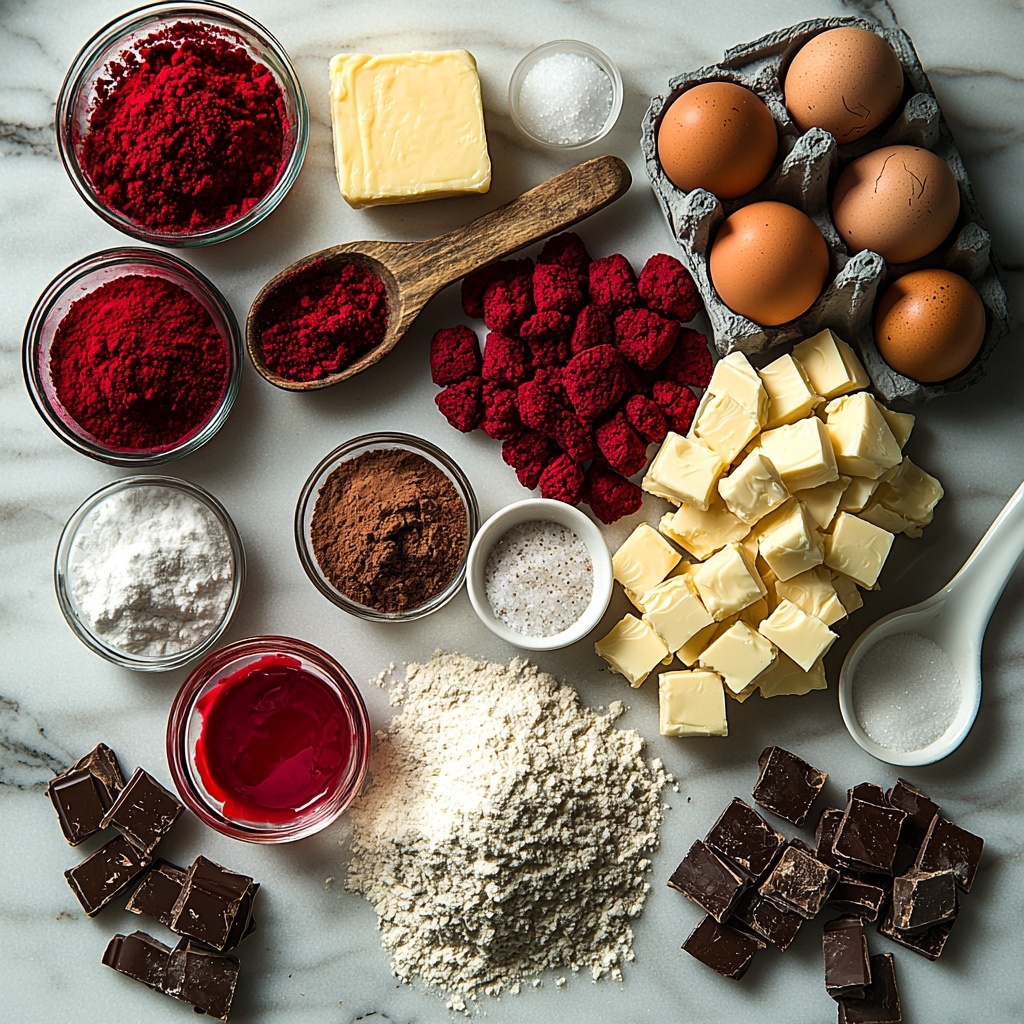
These ingredients are straightforward but essential for nailing that iconic red velvet taste and texture with a delightful white chocolate surprise. Each one plays a crucial role in creating cookies that are soft, flavorful, and beautifully colorful.
- 1 cup unsalted butter, softened: Provides richness and buttery flavor for that tender cookie texture.
- 1 cup granulated sugar: Adds sweetness and helps with a slight crisp on the edges.
- 1 cup brown sugar, packed: Brings moisture and a subtle caramel note to the cookies.
- 2 large eggs: Bind the ingredients and add structure for soft, chewy cookies.
- 1 teaspoon vanilla extract: Enhances the overall flavor with warm, aromatic sweetness.
- 2 tablespoons red food coloring: Gives these cookies their signature bold red hue that’s impossible to resist.
- 3 cups all-purpose flour: The backbone of the dough, ensuring the cookies hold their shape.
- 1 teaspoon baking soda: Helps the cookies rise slightly and adds lightness.
- 1 teaspoon cocoa powder: Adds subtle chocolate depth typical of red velvet desserts.
- 1 teaspoon salt: Balances sweetness and enhances all the other flavors.
- 2 cups white chocolate chunks: The stars of the show, melting beautifully to create pockets of creamy sweetness inside each cookie.
How to Make Red Velvet Cookies With White Chocolate Chunks Recipe
Step 1: Preheat Your Oven
Start by preheating your oven to 350°F (175°C). This ensures that the heat is just right to bake the cookies evenly, giving them crisp edges and soft centers.
Step 2: Cream the Butter and Sugars
In a large bowl, beat together the softened butter, granulated sugar, and brown sugar until the mixture is light and fluffy. This step is key because it incorporates air, helping the cookies rise and become delightfully soft.
Step 3: Mix in Eggs, Vanilla, and Red Food Coloring
Add the eggs, vanilla extract, and red food coloring to your creamed mixture. Beat these together until the color and ingredients are evenly combined, giving the dough its vibrant, signature red velvet look.
Step 4: Mix the Dry Ingredients Separately
In another bowl, whisk together the all-purpose flour, baking soda, cocoa powder, and salt. This ensures the cocoa and rising agent are evenly distributed throughout the flour for consistent texture in every cookie.
Step 5: Combine Wet and Dry Ingredients
Gradually incorporate the dry ingredients into the wet mixture, mixing just until everything is combined. Overmixing can develop too much gluten, making cookies tough instead of tender, so be gentle here.
Step 6: Fold in the White Chocolate Chunks
Gently fold in the white chocolate chunks, making sure they are evenly distributed throughout the dough. These chunks melt slightly during baking, creating bursts of creamy sweetness in every bite.
Step 7: Portion the Dough onto Baking Sheets
Drop spoonfuls of cookie dough onto a lined baking sheet, spacing them a couple of inches apart. This gives the cookies room to spread without merging into one another.
Step 8: Bake Until Edges Are Set
Bake the cookies for 10-12 minutes. You want the edges to be set while the centers stay soft — that perfect contrast is what makes these cookies unforgettable.
Step 9: Cool Before Serving
Let the cookies cool on the baking sheet for a few minutes before transferring them to a wire rack. This cooling period lets them firm up gently without losing that lovely softness inside.
How to Serve Red Velvet Cookies With White Chocolate Chunks Recipe
Garnishes
If you want to add a little something extra, consider sprinkling a few white chocolate shavings or a light dusting of powdered sugar on top of the cookies just before serving. It amps up the visual appeal and adds a delicate sweetness that complements the white chocolate chunks perfectly.
Side Dishes
These cookies are fantastic with a cold glass of milk or a warm cup of coffee or tea. The creamy softness of the white chocolate pairs beautifully with any classic beverage to create a comforting, cozy snack or dessert experience.
Creative Ways to Present
For parties or gifting, stack these cookies in a decorative tin or wrap them individually with a ribbon. You can also sandwich a little cream cheese frosting between two cookies for an indulgent twist on the classic red velvet flavor, turning these treats into mini sandwich desserts.
Make Ahead and Storage
Storing Leftovers
Store leftover cookies in an airtight container at room temperature for 3-4 days. This keeps them soft and fresh, just like the day you baked them, so you can enjoy their delightful melt-in-your-mouth texture anytime.
Freezing
You can freeze the baked cookies by placing them in a single layer on a baking sheet until firm, then transferring them to a freezer-safe container or bag. They can be frozen for up to 3 months without losing their flavor or texture.
Reheating
To bring the cookies back to their just-baked softness, warm them in the microwave for about 10-15 seconds or in a low oven at 300°F for 5 minutes. This reawakens the gooey white chocolate and refreshes their tender crumb.
FAQs
Can I use different types of chocolate instead of white chocolate chunks?
Absolutely! While white chocolate chunks offer a creamy sweetness that contrasts wonderfully with red velvet, dark or milk chocolate chunks can be swapped in for a richer flavor or simply to suit your personal preference.
Is red food coloring necessary in this recipe?
The red food coloring is what gives these cookies that classic red velvet appearance and a slight visual hint of their unique flavor. If you want a more natural approach, beet powder can be used as a substitute, but the color might be less vibrant.
How do I ensure my cookies stay soft and chewy?
Be careful not to overmix your dough and avoid overbaking. Baking until just set on the edges but still soft in the middle, then cooling on the baking sheet, gives you that perfect chewy texture.
Can I make this recipe vegan or dairy-free?
To make these cookies vegan or dairy-free, swap the butter for a plant-based alternative and use flax eggs or another egg substitute. Be sure to choose dairy-free white chocolate chunks or skip them if preferred.
How large should I make the cookie dough scoops?
Use roughly rounded tablespoons of dough for each cookie. This size balances baking time and ensures the cookies spread evenly without becoming too thin or overly thick.
Final Thoughts
If you’re in the mood for a truly special treat, the Red Velvet Cookies With White Chocolate Chunks Recipe is a winner every time. It’s a beautiful blend of rich flavor, stunning color, and creamy sweetness that will have everyone coming back for more. Give this recipe a try and watch these cookies become your new go-to comfort dessert!
Print
Red Velvet Cookies With White Chocolate Chunks Recipe
- Prep Time: 15 minutes
- Cook Time: 12 minutes
- Total Time: 27 minutes
- Yield: 24 servings
- Category: Dessert
- Method: Baking
- Cuisine: American
Description
Delight in these vibrant Red Velvet Cookies with creamy white chocolate chunks that offer a perfect balance of rich cocoa flavor and sweet vanilla undertones. Soft yet slightly chewy, these cookies are easy to make and ideal for any occasion, bringing a festive touch to your dessert table.
Ingredients
Wet Ingredients
- 1 cup unsalted butter, softened
- 1 cup granulated sugar
- 1 cup brown sugar, packed
- 2 large eggs
- 1 teaspoon vanilla extract
- 2 tablespoons red food coloring
Dry Ingredients
- 3 cups all-purpose flour
- 1 teaspoon baking soda
- 1 teaspoon cocoa powder
- 1 teaspoon salt
Add-ins
- 2 cups white chocolate chunks
Instructions
- Preheat Oven: Preheat your oven to 350°F (175°C) to ensure it’s hot and ready for baking.
- Cream Butter and Sugars: In a large mixing bowl, cream together the softened unsalted butter, granulated sugar, and brown sugar until the mixture is light and fluffy, creating the perfect base for your cookie dough.
- Add Wet Ingredients: Mix in the eggs one at a time, followed by the vanilla extract and red food coloring, ensuring all ingredients are well incorporated for that signature red velvet hue.
- Mix Dry Ingredients: In a separate bowl, whisk together the all-purpose flour, baking soda, cocoa powder, and salt to evenly distribute the leavening agent and cocoa flavor.
- Combine Wet and Dry: Gradually add the dry ingredients to the wet ingredients, mixing gently until just combined to avoid overworking the dough and maintain a tender texture.
- Fold in Chocolate Chunks: Carefully fold in the white chocolate chunks, dispersing them evenly throughout the dough for bursts of creamy sweetness in every bite.
- Shape Cookies: Drop spoonfuls of the dough onto a baking sheet lined with parchment paper or a silicone mat, spacing them adequately to allow for spreading during baking.
- Bake: Bake in the preheated oven for 10-12 minutes or until the edges are set but the centers remain soft, keeping the cookies moist and chewy.
- Cool: Let the cookies cool on the baking sheet for a few minutes before transferring them to a wire rack to cool completely, preventing them from breaking apart.
Notes
- You can substitute white chocolate chunks with white chocolate chips if preferred.
- Do not overmix the dough to ensure soft, tender cookies.
- For a more intense red color, add a few extra drops of red food coloring if desired.
- Store cookies in an airtight container to keep them fresh for up to 5 days.
- These cookies freeze well; freeze baked cookies in a sealed bag for up to 3 months.


