
If you’re craving a snack that is as satisfying as it is nutritious, the No-Bake Chocolate Peanut Butter Protein Balls Recipe is an absolute game-changer. This delightful treat brings together creamy peanut butter and rich chocolate protein in a perfectly chewy bite, making it an ideal fuel-up snack or quick dessert. With no oven required and ingredients you probably already have, it’s as simple to whip up as it is delicious. Whether you’re refueling after a workout or need a grab-and-go energy boost, these protein balls deliver on taste, texture, and that wonderful sense of homemade good stuff.
Ingredients You’ll Need
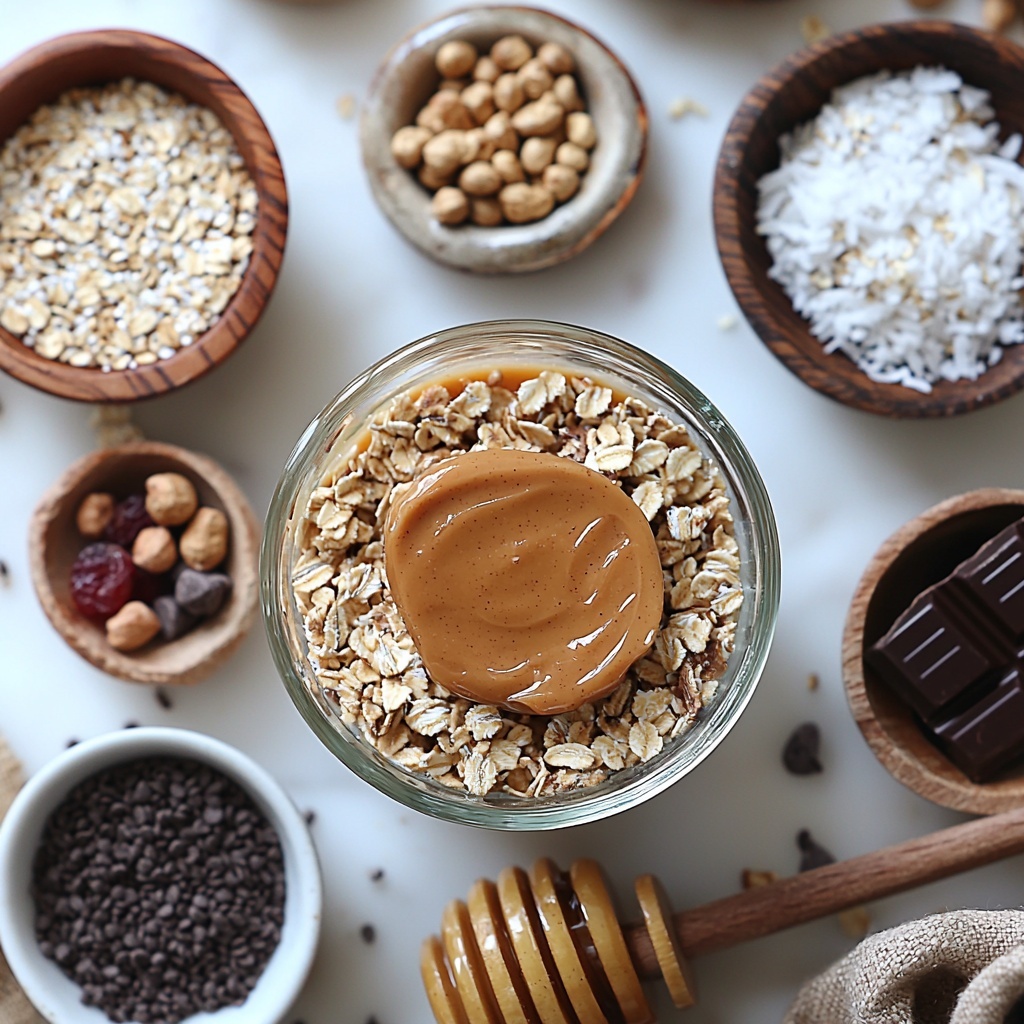
The magic of the No-Bake Chocolate Peanut Butter Protein Balls Recipe lies in its straightforward ingredients, each chosen to contribute a burst of flavor, a satisfying texture, or a touch of nutrition. From creamy peanut butter to oats that provide chew and body, each component plays a starring role in this snack sensation.
- Natural creamy peanut butter: Provides a rich, nutty base and binds the balls together with creamy goodness.
- Honey or pure maple syrup: Adds natural sweetness and helps hold everything in place.
- Pure vanilla extract: Enhances the overall flavor with a warm, aromatic touch.
- Old-fashioned rolled oats: Give the balls a hearty, chewy texture and a rustic feel.
- Quick oats: Help with binding for that perfect firm but tender bite.
- Chocolate protein powder: Packs a protein punch and boosts the chocolate flavor depth.
- Unsweetened cocoa powder: Contributes rich chocolate intensity without added sugar.
- Ground flaxseed or chia seeds: Adds fiber and nutrition while aiding in texture.
- Fine sea salt: Balances the sweetness and deepens the chocolate flavor.
- Mini dark chocolate chips or finely chopped dark chocolate: Little bursts of melty chocolate joy in every bite.
- Water or milk of choice (optional): To adjust the dough’s consistency for easy rolling.
- Optional mix-ins (coconut, chopped peanuts, hemp hearts, dried fruit): Customizable extras for added flavor, texture, and nutrition.
How to Make No-Bake Chocolate Peanut Butter Protein Balls Recipe
Step 1: Prepare Your Workspace
Start by setting the stage for success—line a baking sheet or plate with parchment paper to keep your protein balls from sticking. Give yourself a bit of clear counter space for the rolling process because this step gets wonderfully hands-on and fun.
Step 2: Mix the Wet Ingredients
In a medium bowl, combine the creamy peanut butter, honey (or maple syrup), and vanilla extract. If your peanut butter feels too thick or cold, warming it briefly in the microwave softens it up for easier mixing. Stir until everything is smooth and perfectly blended—the creamy base you need for those perfect protein balls.
Step 3: Combine the Dry Ingredients
Next, whisk together rolled oats, quick oats, chocolate protein powder, cocoa powder, ground flaxseed (or chia seeds), and sea salt in a separate bowl. This step ensures these dry elements are evenly mixed and free of any clumps, setting the stage for a uniform dough texture.
Step 4: Form the Base Mixture
Add the dry ingredients to your wet peanut butter mixture and stir vigorously with a sturdy spoon. As the mixture starts thickening, press and fold to hydrate the oats and powders evenly. The result should be a dense, cohesive dough that’s ready for just a little tweaking.
Step 5: Adjust Texture with Liquid
Test the dough by squeezing a bit between your fingers. If crumbly, slowly add water or milk, one tablespoon at a time, mixing thoroughly between additions. Your goal is a dough that feels like moist, easy-to-roll cookie dough—not sticky or runny, just perfectly pliable. Usually, 2 to 3 tablespoons is just right depending on your ingredients.
Step 6: Fold in Chocolate and Optional Mix-ins
Stir in mini dark chocolate chips or chopped chocolate for those irresistible chocolate pockets. If you’re feeling creative, mix in your choice of shredded coconut, chopped peanuts, hemp hearts, or finely chopped dried fruit for extra texture and flavor complexity. Fold until everything is well distributed.
Step 7: Chill for Easier Rolling (Optional)
If the dough feels too sticky to handle, pop the bowl into the fridge for 15 to 20 minutes. This cooling step firms up the peanut butter, making the shaping process smoother and less messy.
Step 8: Shape the Protein Balls
Using a small cookie scoop or tablespoon, portion the dough into even mounds and roll between your palms to form round balls about 1 to 1.5 inches in diameter. You’ll get roughly 18 to 24 balls depending on size. Place them on your parchment-lined surface ready for the final chill.
Step 9: Final Chill and Set
Refrigerate the protein balls for at least 30 minutes. This step firms them up nicely and allows the flavors to meld and deepen. Once set, they’re ready to enjoy or store for later snacking bliss.
How to Serve No-Bake Chocolate Peanut Butter Protein Balls Recipe
Garnishes
Sprinkle a dusting of extra unsweetened cocoa powder or a few flaky sea salt crystals on top for an elegant finishing touch. If you want a crunchy contrast, roll them in finely chopped nuts or toasted coconut before chilling. These little additions transform the look and taste beautifully.
Side Dishes
Pair these protein balls with fresh fruit like sliced apples or a small bowl of Greek yogurt for an added boost of freshness and creaminess. They also complement a smoothie perfectly, making your snack or breakfast feel like a mini celebration.
Creative Ways to Present
Arrange the protein balls in mini cupcake liners or place them in a decorative glass jar for an inviting presentation. They also make great gifts when wrapped in parchment paper and tied with a rustic twine bow. Fun, tasty, and thoughtful all in one!
Make Ahead and Storage
Storing Leftovers
Your No-Bake Chocolate Peanut Butter Protein Balls Recipe keeps beautifully in an airtight container in the refrigerator for up to one week. This makes them a fantastic make-ahead snack to grab when the afternoon hunger pangs hit.
Freezing
For longer storage, freeze the protein balls in a single layer on a tray first. Once frozen solid, transfer them to a freezer-safe bag or container. They’ll stay fresh for up to two to three months, making meal prep and healthy snacking incredibly convenient.
Reheating
No need to heat! Simply let frozen protein balls sit at room temperature for 5 to 10 minutes to soften slightly before enjoying. Their texture and flavor hold up wonderfully even when straight from the freezer.
FAQs
Can I use almond butter instead of peanut butter?
Absolutely! Almond butter makes a delicious alternative and will give the balls a slightly different nutty flavor while maintaining the creamy texture you want.
What type of protein powder works best in this recipe?
Both whey and plant-based protein powders work well. Choose your favorite type—just be mindful of flavor profiles and sweetness levels to best complement the chocolate and peanut butter.
Can I make these nut-free?
You can replace peanut butter with sunflower seed butter or another nut-free spread. Also, be sure to verify your protein powder and other ingredients are free from nut contamination if allergies are a concern.
How can I make these sweeter or less sweet?
Adjust the amount of honey or maple syrup to suit your taste. You can reduce it for a less sweet version or add a touch more for extra sweetness, keeping in mind the balance with the cocoa and protein powder.
Can I add other flavors to the protein balls?
Definitely! Feel free to experiment with spices like cinnamon or espresso powder, or add extracts like almond or coconut to personalize your version of the No-Bake Chocolate Peanut Butter Protein Balls Recipe.
Final Thoughts
I can’t recommend this No-Bake Chocolate Peanut Butter Protein Balls Recipe enough. It’s one of those few recipes that combines simplicity with such a satisfying result. Whether it’s a quick snack, a post-workout nibble, or a little bite to brighten your day, these protein balls do it all with charm and flavor. Give them a try—you might just find your new favorite go-to treat.
Print
No-Bake Chocolate Peanut Butter Protein Balls Recipe
- Prep Time: 15 minutes
- Cook Time: 0 minutes
- Total Time: 50 minutes (includes chilling time)
- Yield: 18-24 protein balls
- Category: Snack
- Method: No-Cook
- Cuisine: American
- Diet: Low Fat
Description
These No-Bake Chocolate Peanut Butter Protein Balls are a delicious, quick, and easy snack packed with protein and wholesome ingredients. Combining creamy peanut butter, oats, chocolate protein powder, and a touch of sweetness, these energy bites are perfect for on-the-go fuel, post-workout snacks, or a healthy treat. They require no baking and are simple to prepare, offering a moist, chewy texture with a rich chocolate and peanut butter flavor.
Ingredients
Wet Ingredients
- 1 cup natural creamy peanut butter (well-stirred)
- 1/3 cup honey or pure maple syrup
- 1 teaspoon pure vanilla extract
- 2–4 tablespoons water or milk of choice (only as needed to adjust texture)
Dry Ingredients
- 1 1/4 cups old-fashioned rolled oats
- 1/4 cup quick oats (for better binding; or use all rolled oats if preferred)
- 1/3 cup chocolate protein powder (whey or plant-based)
- 1/4 cup unsweetened cocoa powder
- 2 tablespoons ground flaxseed or chia seeds
- 1/4 teaspoon fine sea salt
Add-ins
- 1/3 cup mini dark chocolate chips or finely chopped dark chocolate
- Optional mix-ins (choose up to 1/2 cup total):
- 2–3 tablespoons shredded unsweetened coconut
- 2 tablespoons chopped peanuts
- 2 tablespoons hemp hearts
- 2 tablespoons dried fruit, finely chopped
Instructions
- Prepare your workspace: Line a baking sheet or a large plate with parchment paper to prevent the protein balls from sticking. Clear some counter space for rolling.
- Mix the wet ingredients: In a medium mixing bowl, combine peanut butter, honey (or maple syrup), and vanilla extract. Stir with a spatula or wooden spoon until smooth and fully combined. If peanut butter is very thick or cold, microwave for 10–15 seconds to soften, then stir again.
- Combine dry ingredients: In a separate bowl, add rolled oats, quick oats, protein powder, cocoa powder, ground flaxseed (or chia seeds), and salt. Whisk or stir thoroughly to evenly distribute ingredients and remove clumps.
- Form the base mixture: Add the dry ingredients to the peanut butter mixture. Stir with a sturdy spoon or spatula, folding the ingredients together until the mixture forms a thick, dense dough. Press and fold to fully hydrate oats and powders.
- Adjust texture with liquid: Check the dough by pressing some between your fingers. If too crumbly and not holding, add water or milk one tablespoon at a time, mixing thoroughly after each addition. Aim for a dough consistency similar to cookie dough—moist, cohesive, easy to roll without cracking, but not sticky or runny. Usually, 2–3 tablespoons of liquid suffice.
- Fold in chocolate and optional mix-ins: Add mini chocolate chips or chopped dark chocolate and any optional mix-ins such as coconut, chopped peanuts, hemp hearts, or dried fruit. Stir and fold until evenly distributed.
- Chill briefly for easier rolling: If the mixture feels soft or sticky, refrigerate for 15–20 minutes to firm up the peanut butter and make dough easier to handle.
- Shape the protein balls: Using a small cookie scoop or tablespoon, portion out the dough into mounds about 1 to 1.5 inches in diameter. Roll each portion between palms to form smooth, round balls. Place on parchment-lined baking sheet or plate. This should yield approximately 18–24 balls depending on size.
- Final chill and set: Transfer the tray or plate to the refrigerator and chill for at least 30 minutes to firm up and allow flavors to meld. After chilling, they are ready to enjoy or store.
- Storage: Transfer protein balls to an airtight container. Store refrigerated up to one week. For longer storage, freeze in a single layer, then transfer to freezer-safe bags or containers for up to 2–3 months. To serve from frozen, let sit at room temperature for 5–10 minutes to soften slightly.
Notes
- Use natural creamy peanut butter for best texture and flavor.
- If preferred, substitute honey with pure maple syrup for a vegan option.
- Protein powder type can be whey or plant-based depending on preference.
- The liquid amount varies depending on the protein powder and peanut butter consistency; add gradually to avoid a runny dough.
- Optional mix-ins add texture and flavor but are not necessary.
- Chilling the dough before rolling helps manage stickiness and makes rolling easier.
- Store in an airtight container to maintain freshness and avoid drying out.
- Can be customized with other mix-ins like seeds or nuts as desired.
