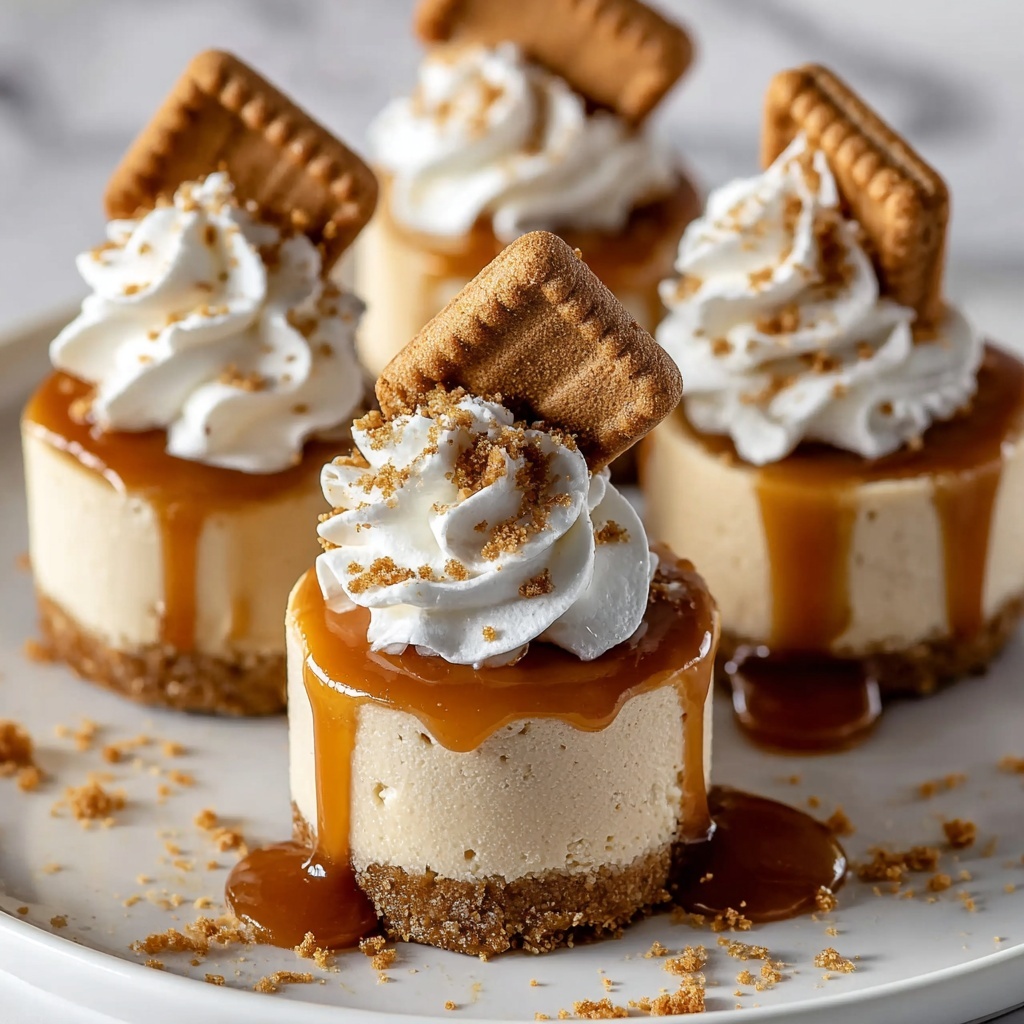
If you have a sweet tooth and love desserts that are both effortless and irresistibly tasty, then this No Bake Biscoff Cheesecake: Easy, Delicious Dessert Recipe is exactly what you need to try next. With its luscious, creamy filling infused with the rich, caramelized flavor of Biscoff spread, and a crunchy cookie crust that provides the perfect contrast, this cheesecake is a showstopper without the fuss of baking. It’s the ideal treat to impress family and friends or simply spoil yourself on any day of the week.

Ingredients You’ll Need
This recipe calls for simple yet essential ingredients that come together seamlessly to create a decadent dessert. Each component plays a vital role, whether it’s the buttery base, the creamy center, or the indulgent Biscoff flavor that ties it all together.
- Biscoff cookies (250g): These form the crunchy, flavorful crust, adding depth with their unique spiced brown sugar taste.
- Unsalted butter, melted (100g): Helps bind the cookie crumbs into a sturdy and buttery base.
- Cream cheese, softened (400g): The rich, smooth foundation for the cheesecake filling.
- Granulated sugar (100g): Sweetens the cheesecake perfectly without overpowering the Biscoff flavor.
- Biscoff spread (250g): Adds that irresistible, signature spiced caramel taste that makes this dessert stand out.
- Heavy cream (300ml): Whipped until stiff peaks form, it lightens the filling to a fluffy, melt-in-your-mouth texture.
How to Make No Bake Biscoff Cheesecake: Easy, Delicious Dessert Recipe
Step 1: Prepare the Crust
Begin by crushing those wonderful Biscoff cookies into fine, crumbly bits. Mixing them with melted butter creates a perfect, buttery base that you press firmly into your springform pan. This crust is what gives you that satisfying crunch and a lovely contrast to the smooth filling. Chill it well so it sets nicely before moving on.
Step 2: Make the Cheesecake Filling
Next, whip the cream cheese and sugar together until you get a luxuriously smooth mixture. Adding the Biscoff spread is where the magic happens, infusing the filling with its iconic caramelized flavor. Separately, whip the heavy cream until stiff and gently fold it in, ensuring your filling remains airy and light—this step is key to that silky texture you’ll adore.
Step 3: Assemble the Cheesecake
Pour your heavenly cheesecake filling over the prepared crust, smoothing it out evenly. For a little flair, drizzle some extra Biscoff spread on top and use a knife to swirl it into a beautiful marbled pattern. Cover and refrigerate for at least four hours, though if you can wait overnight, the flavors will deepen and the texture will be even more dreamy.
Step 4: Serve
Once your cheesecake is perfectly set, gently run a knife along the edges before releasing the sides of the springform pan. Slice it up and serve chilled, maybe with a dollop of whipped cream or a sprinkle of crushed Biscoff cookies. It’s guaranteed to be a crowd-pleaser every single time.
How to Serve No Bake Biscoff Cheesecake: Easy, Delicious Dessert Recipe
Garnishes
To add that extra wow factor, consider topping your cheesecake with some crushed Biscoff cookies, a drizzle of caramel sauce, or a cloud of freshly whipped cream. These simple additions elevate the look and taste, making it feel like a dessert from a fancy bakery.
Side Dishes
This cheesecake pairs beautifully with fresh berries, such as raspberries or strawberries, which cut through the richness and add a pop of color. A cup of strong coffee or espresso alongside also complements the spiced, caramel notes perfectly.
Creative Ways to Present
For parties, serve the cheesecake in individual glass jars or mini dessert cups layered with extra cookie crumbs and a swirl of Biscoff spread for a charming, fuss-free presentation. Alternatively, garnish with edible gold leaf or chocolate curls for a sophisticated touch that will wow your guests.
Make Ahead and Storage
Storing Leftovers
If you have any leftovers (though that’s unlikely!), cover the cheesecake tightly with plastic wrap and store it in the refrigerator for up to three days. This keeps it fresh and the texture just right.
Freezing
You can freeze this cheesecake by wrapping it securely in plastic wrap and foil. Freeze for up to two months and thaw overnight in the fridge before serving. Keep in mind that the texture may be slightly different after freezing, but still delicious.
Reheating
Since this is a no bake dessert, reheating is not necessary and could affect the texture negatively. It’s best enjoyed chilled straight from the fridge, where its creamy texture shines brightest.
FAQs
Can I use a different type of cookie for the crust?
Absolutely! While Biscoff cookies give this cheesecake its signature flavor, you can swap them for graham crackers or digestive biscuits if needed. Just keep in mind the flavor profile will change.
Is it necessary to soften the cream cheese?
Yes, softening the cream cheese ensures it blends smoothly with the other ingredients, preventing lumps and giving you that perfect creamy texture.
Can I make the cheesecake sugar-free?
Yes, you can substitute the granulated sugar with a sugar-free alternative like erythritol, but be sure to choose one suitable for baking and adjust sweetness to taste.
What’s the best pan to use for this recipe?
A 9-inch springform pan works best because it allows easy removal of the cheesecake without damaging its shape, perfect for serving.
Can I add fruit to the cheesecake?
Definitely! Fresh or lightly macerated fruits can be folded into the filling or added as a topping to bring a fresh, vibrant contrast to the rich Biscoff flavor.
Final Thoughts
This No Bake Biscoff Cheesecake: Easy, Delicious Dessert Recipe is truly a crowd-pleaser that brings together simplicity and decadence in one delightful package. Whether you’re a seasoned baker or just looking for a fuss-free dessert to impress, this recipe will quickly become a beloved favorite. Go ahead and whip one up – your taste buds will thank you!
Print
No Bake Biscoff Cheesecake: Easy, Delicious Dessert Recipe
- Prep Time: 20 minutes
- Cook Time: 0 minutes
- Total Time: 4 hours 20 minutes (includes chilling time)
- Yield: 8 servings
- Category: Dessert
- Method: No-Cook
- Cuisine: American
Description
This No Bake Biscoff Cheesecake is a rich and creamy dessert that combines the irresistible flavors of Biscoff cookies and spread with smooth cream cheese and whipped cream. Perfect for a quick and easy treat, this cheesecake requires no baking and is sure to impress with its delicious taste and beautiful marbled topping.
Ingredients
Crust
- 250g Biscoff cookies
- 100g unsalted butter, melted
Filling
- 400g cream cheese, softened
- 100g granulated sugar
- 250g Biscoff spread
- 300ml heavy cream
Instructions
- Prepare the Crust: Start by crushing 250g of Biscoff cookies into fine crumbs. In a medium bowl, mix the cookie crumbs with 100g of melted unsalted butter until well combined. Press this mixture firmly into the bottom of a 9-inch springform pan to form an even crust. Chill in the refrigerator while you prepare the filling.
- Make the Cheesecake Filling: In a large mixing bowl, beat 400g of softened cream cheese and 100g of granulated sugar together until smooth and creamy. Add 250g of Biscoff spread and mix until combined. In a separate bowl, whip 300ml of heavy cream until stiff peaks form. Gently fold the whipped cream into the cream cheese mixture, being careful not to deflate it.
- Assemble the Cheesecake: Pour the cheesecake filling over the prepared crust and smooth the top with a spatula. Drizzle some extra Biscoff spread on top if desired, and use a knife to create a marbled effect. Cover the cheesecake with plastic wrap and refrigerate for at least 4 hours, or overnight for the best results.
- Serve: Once the cheesecake is set, run a knife around the edges of the springform pan before releasing the sides. Slice and serve chilled, garnished with additional Biscoff cookies or whipped cream if you like.
Notes
- For best results, refrigerate the cheesecake overnight to allow it to fully set.
- You can substitute Biscoff spread with any other flavored cookie butter if desired.
- Make sure the cream cheese is softened to avoid lumps in the filling.
- Use a gentle folding technique to keep the whipped cream fluffy and light in the filling.
- This cheesecake should be stored in the refrigerator and consumed within 3-4 days.


