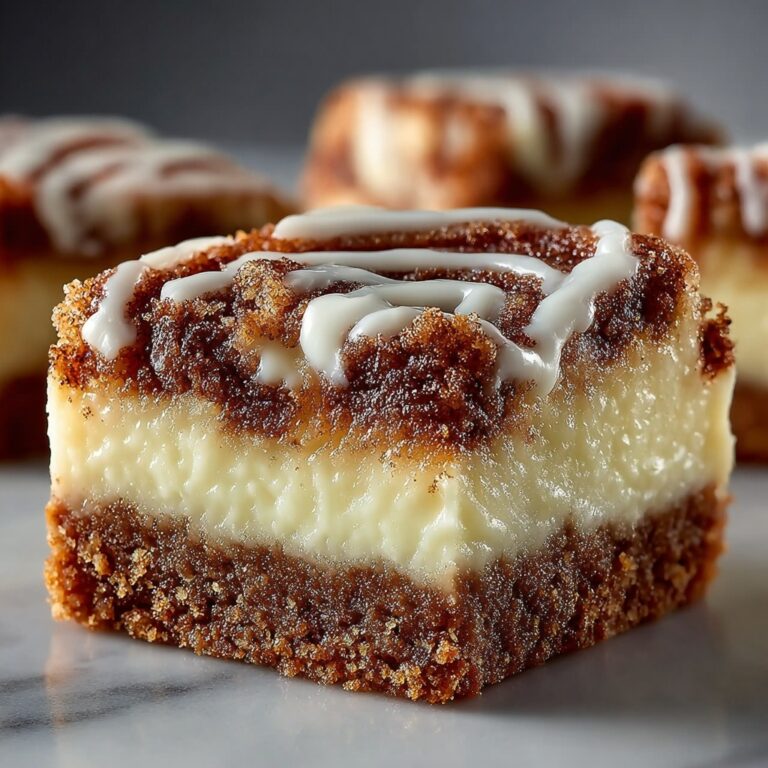
If you are a fan of rich, creamy desserts with a delightful cookie crunch, you are going to absolutely adore this No-Bake Biscoff Cheesecake Cups Recipe. It’s a wonderfully simple treat that combines the spicy caramel notes of Lotus Biscoff biscuits with smooth, luscious cheesecake filling, all layered beautifully in individual cups. Perfect for impressing guests or indulging yourself without turning on the oven, these no-bake cheesecake cups are comfort wrapped in a delicate, elegant package.
Ingredients You’ll Need
Each ingredient in this recipe plays a crucial role, coming together effortlessly to create a dessert that tastes far more complicated than it is. From the buttery biscoff biscuit base to the creamy, airy filling, you’ll find that these essentials bring wonderful texture, flavor, and a gorgeous golden tone to the cups.
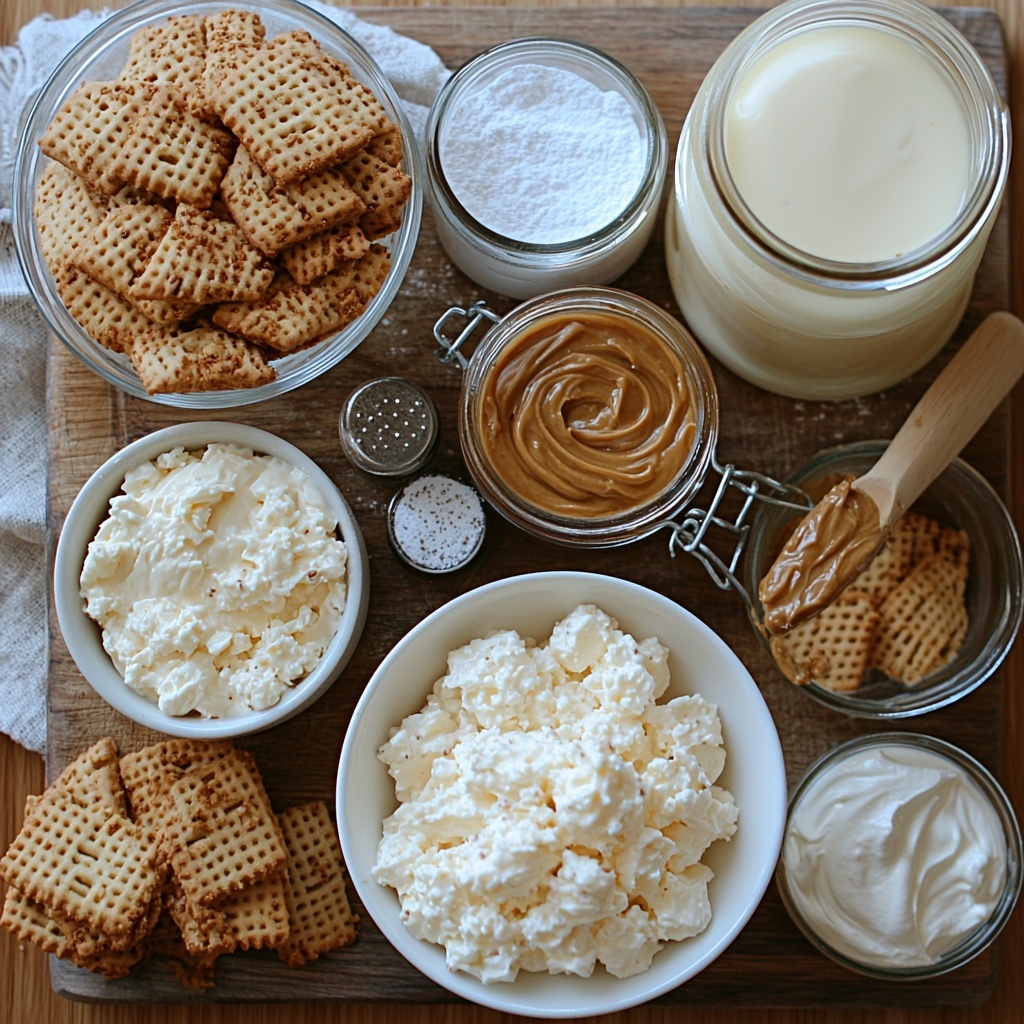
- 30 Lotus Biscoff biscuits: These iconic caramelized biscuits form the crunchy, flavorful crust.
- 2 tablespoons unsalted butter (melted): Helps bind the biscuit crumbs and adds richness to the base.
- 16 oz heavy cream (2 cups): Whipped to soft peaks, it gives the cheesecake filling its dreamy, light texture.
- 8 oz cream cheese (at room temp): The creamy backbone of the cheesecake filling, lending tangy richness.
- ½ cup powdered sugar: Sweetens the cheesecake lightly without graininess.
- ½ cup Biscoff spread: Enhances the filling’s signature Biscoff flavor with smooth caramel notes.
- 1 teaspoon vanilla extract: Adds warmth and depth to the filling’s flavor profile.
- Additional ½ cup Biscoff spread (for topping): Melted to create a glossy, irresistible layer on top.
- 8 Biscoff cookies (halved): Decorative garnish that adds charm and extra crunch.
How to Make No-Bake Biscoff Cheesecake Cups Recipe
Step 1: Make the Base
Begin by crushing the Lotus Biscoff biscuits until you have fine crumbs, either with a food processor or by placing them in a sealed bag and rolling with a pin. Next, toss those crumbs with melted unsalted butter to help them stick together and form a perfect base texture. Don’t forget to set aside a few tablespoons of the crumb mixture for garnish later—it adds a lovely rustic touch.
Step 2: Form the Crust in Cups
Divide your buttery biscuit crumbs into individual cups—this recipe yields about 8 regular dessert cups or up to 16 shot-sized servings depending on your preference. Press 2 to 3 tablespoons of crumbs firmly down in each cup, creating a solid, even layer that will offer that delightful crunch contrasting the creamy filling.
Step 3: Whip the Heavy Cream
Take your heavy cream and beat it until it forms stiff peaks. This means when you lift your whisk out of the bowl, the cream stands tall and doesn’t slouch. Whipped cream introduces lightness and air into the cheesecake mixture, ensuring each spoonful feels fluffy and indulgent.
Step 4: Prepare the Cheesecake Filling
In a separate bowl, combine the cream cheese with powdered sugar, Biscoff spread, and vanilla extract. Whip everything until the mixture is smooth and creamy without lumps. Then gently fold your whipped cream into this cheesecake base—folding slowly ensures the air stays trapped in the mixture, giving your cheesecake that luxurious texture.
Step 5: Assemble the Cheesecake Cups
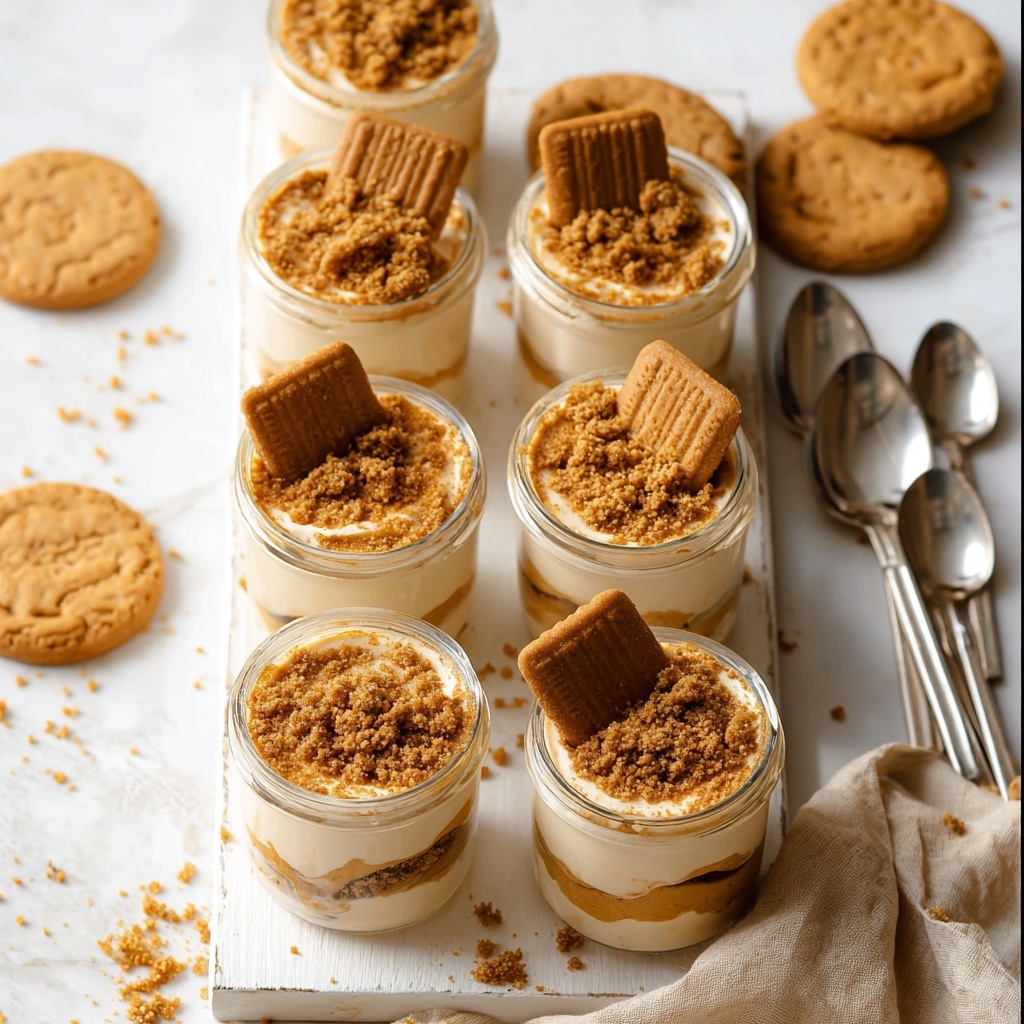
Transfer the creamy filling into a piping bag for neater assembly, then pipe the mixture into your prepared cups on top of the biscuit base. Warm the remaining Biscoff spread briefly in the microwave to make it pourable and spoon or drizzle a thin layer on top of each cheesecake cup. Decorate with halved Biscoff cookies and sprinkle the reserved crumbs to elevate both texture and appearance.
Step 6: Chill and Set
Refrigerate the assembled cups for at least 4 hours to allow the cheesecake to firm up beautifully. Once chilled, each bite will have that perfect balance of creamy filling and crunchy base, ready to delight your taste buds and those of anyone lucky enough to share these cups with you.
How to Serve No-Bake Biscoff Cheesecake Cups Recipe
Garnishes
Simple yet impactful garnishes make a huge difference. A sprinkling of reserved cookie crumbs adds texture and visual appeal. The halved Biscoff cookies perched on top scatter warm caramel aroma and an inviting crunch. For an extra touch, a light dusting of cinnamon or a drizzle of caramel sauce pairs beautifully too.
Side Dishes
Serving these cups alongside fresh berries like raspberries or strawberries cuts through the richness, offering a bright contrast. A small dollop of whipped cream or a scoop of vanilla ice cream on the side can transform your dessert into a luxurious spread perfect for sharing.
Creative Ways to Present
For parties or special occasions, try serving your Biscoff cheesecake cups in clear glass jars or mini mason jars for a rustic look. Layering with whole biscuit halves inside the cup as a surprise adds visual interest. Topping with edible gold leaf or a sprinkle of toasted nuts can impress guests with minimal extra effort.
Make Ahead and Storage
Storing Leftovers
Your No-Bake Biscoff Cheesecake Cups Recipe keeps beautifully in the refrigerator for up to 3 days. Cover each cup tightly with plastic wrap or store in an airtight container to maintain the freshness of the creamy filling and crisp base.
Freezing
If you want to prepare these delights in advance, freezing is an option. Freeze the cups uncovered for a couple of hours, then wrap them individually to avoid freezer burn. When ready to enjoy, thaw in the refrigerator overnight. Note the texture may be slightly softer after freezing but still delicious.
Reheating
Since these are no-bake and served cold, reheating is unnecessary. Simply thaw frozen cups slowly in the fridge and serve chilled to maintain the perfect consistency and flavor of the cheesecake.
FAQs
Can I use regular cream cheese instead of room temperature?
It’s best to use cream cheese at room temperature to avoid lumps and achieve a smooth filling. Cold cream cheese is harder to mix and can create an uneven texture.
What if I don’t have Lotus Biscoff spread?
You can try substituting with a similar cookie butter spread, but the unique spiced caramel flavor of Lotus Biscoff is what makes this recipe special. Using a different spread may alter the taste slightly.
Can these cups be made vegan or dairy-free?
With some ingredient swaps like coconut cream for heavy cream and vegan cream cheese alternatives, you could adapt this recipe, though the flavor profile will differ from the original Biscoff cheesecake experience.
How long do these cheesecake cups need to chill?
Chilling for at least 4 hours is crucial to allow the filling to firm up properly and for the flavors to meld together beautifully.
Can I make these cheesecake cups in advance for a party?
Absolutely! They’re perfect for prepping ahead of time, and chilling overnight only enhances their flavor and texture, making party day stress-free and delicious.
Final Thoughts
I can’t recommend enough giving this No-Bake Biscoff Cheesecake Cups Recipe a try the next time you crave a dessert that feels decadent yet comes together quickly without heat. It’s a true crowd-pleaser that brings comfort, flair, and that unmistakable Biscoff charm to every bite. You’ll find yourself reaching for these cups again and again – and happily sharing them with everyone you know!
Print
No-Bake Biscoff Cheesecake Cups Recipe
- Prep Time: 20 minutes
- Cook Time: 0 minutes
- Total Time: 4 hours 20 minutes
- Yield: 8 regular-sized cups or 16 shot-sized cups
- Category: Dessert
- Method: No-Cook
- Cuisine: American
Description
Delight in these creamy and decadent No-Bake Biscoff Cheesecake Cups, featuring a crunchy Biscoff biscuit base, a smooth and fluffy Biscoff-infused cream cheese filling, and a luscious Biscoff spread topping. Perfectly portioned into individual cups, these easy-to-make desserts require no baking and are chilled to set, making them an ideal treat for any occasion.
Ingredients
Base
- 30 Lotus Biscoff biscuits
- 2 tablespoons unsalted butter (melted)
Cheesecake Filling
- 16 oz heavy cream (2 cups)
- 8 oz cream cheese (at room temperature)
- 1/2 cup powdered sugar
- 1/2 cup Lotus Biscoff spread
- 1 teaspoon vanilla extract
Topping and Decoration
- 1/2 cup Lotus Biscoff spread (melted)
- 8 Lotus Biscoff cookies (cut in half)
- Reserved Biscoff biscuit crumbs
Instructions
- Make the Base: Crush the Lotus Biscoff biscuits into fine crumbs using a food processor or a rolling pin. In a medium bowl, combine the crushed biscuit crumbs with 2 tablespoons of melted unsalted butter. Reserve a few tablespoons of this crumb mixture for later decoration.
- Form the Base in Cups: Divide the crumb mixture evenly among your dessert cups—this recipe yields approximately 8 regular-sized or up to 16 shot-sized cups. Press about 2-3 tablespoons of crumb mixture firmly into the bottom of each cup to create an even base layer. Set the cups aside.
- Whip the Cream: In a large mixing bowl, whisk the heavy cream vigorously until stiff peaks form, indicating the cream is fully whipped and stable.
- Prepare the Cheesecake Filling: In another bowl, whisk together the room-temperature cream cheese, powdered sugar, 1/2 cup Lotus Biscoff spread, and vanilla extract until the mixture is smooth and creamy. Gently fold the whipped cream into this mixture gradually, ensuring it is fully incorporated without deflating the cream.
- Assemble the Cheesecake Cups: Transfer the cheesecake filling into a large piping bag for easy and neat filling. Pipe the mixture into each dessert cup over the biscuit base to fill them.
- Add Topping and Decoration: Melt 1/2 cup of Lotus Biscoff spread in the microwave for about 20 seconds or until smooth and pourable. Spoon or pipe a thin layer of the melted spread onto the top of each cheesecake cup. Decorate by placing halved Lotus Biscoff cookies on top and sprinkle with the reserved biscuit crumbs for added texture and visual appeal.
- Chill to Set: Refrigerate the assembled cheesecake cups for at least 4 hours, allowing them to firm up and the flavors to meld. Serve these delicious desserts chilled for the best taste and texture.
Notes
- You can crush the biscuits by placing them in a sealed plastic bag and rolling with a rolling pin if you don’t have a food processor.
- Ensure the cream cheese is at room temperature for a smooth filling without lumps.
- Use chilled heavy cream for better whipping results.
- For a firmer set, refrigerate the cheesecake cups overnight.
- These cups can be stored in the refrigerator for up to 3 days.
- For easier serving, you can use shot glasses or small dessert cups.


