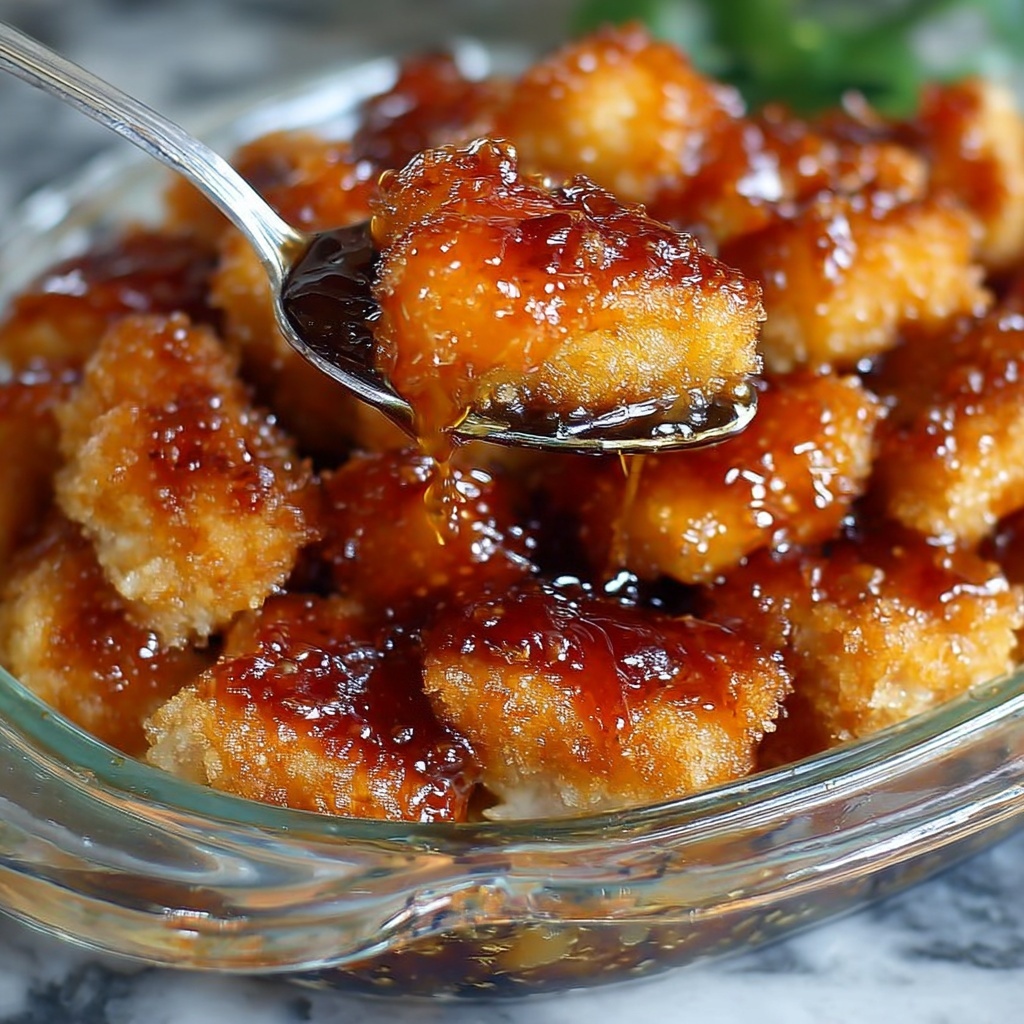
If you’ve been craving a dish that perfectly balances tangy, sweet, and savory flavors with tender, crispy chicken, then you’ve got to try this Baked Sweet and Sour Chicken Recipe. It’s the kind of meal that feels like a warm hug on a plate — comforting, colorful, and unbelievably tasty. By baking instead of deep-frying, this recipe keeps things lighter while still delivering that irresistible crispiness and sauce-soaked goodness that everyone loves. Whether you’re cooking for a family dinner or meal prepping for the week, this chicken dish is sure to satisfy and impress without complicated steps or hard-to-find ingredients.
Ingredients You’ll Need
Gathering these simple yet essential ingredients is the first step to making your kitchen smell amazing and ensuring you get that perfect balance of flavor and texture. Each item plays a vital role, from creating the crispy coating on the chicken to building that signature sweet and sour sauce that ties everything together beautifully.
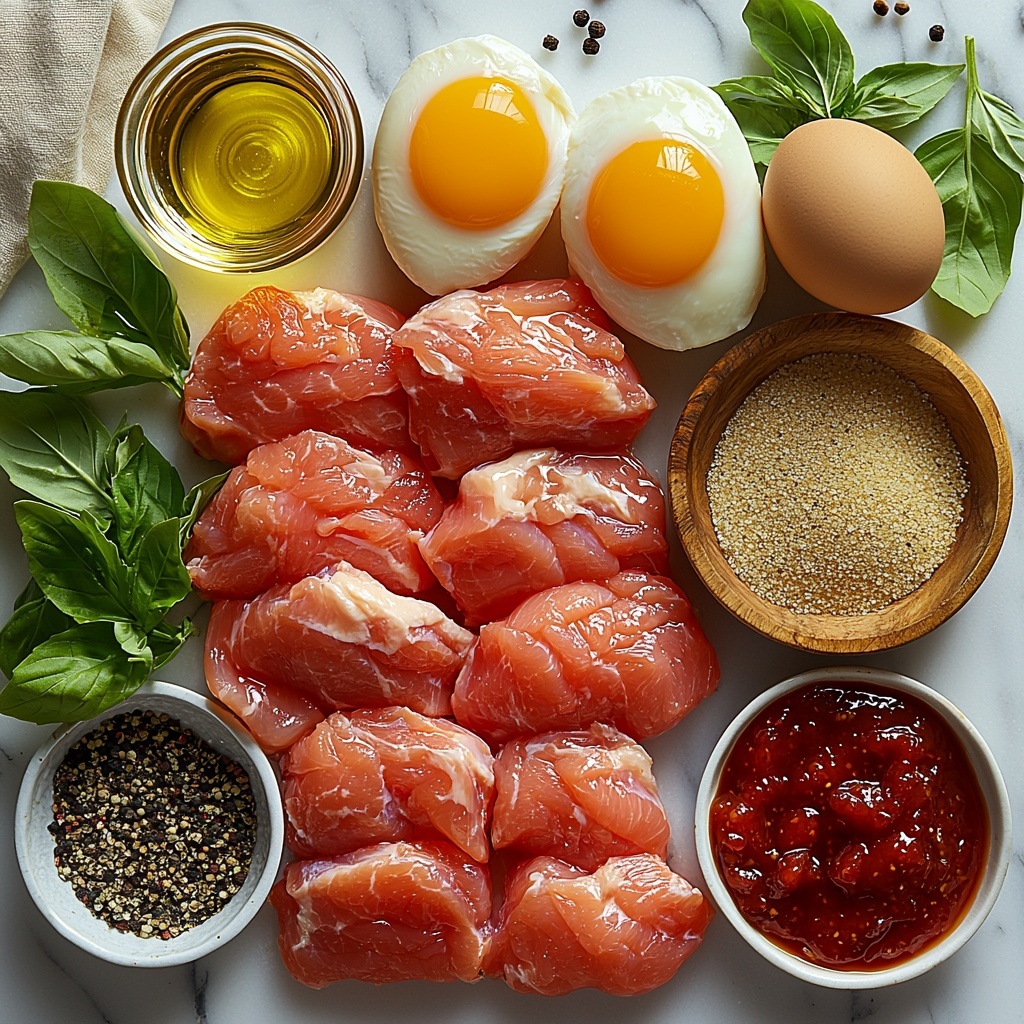
- 3-4 boneless, skinless chicken breasts: The tender protein base, perfect for bite-sized pieces that soak up the sauce.
- Salt and pepper: Essential seasonings to bring out the natural flavors of the chicken.
- 1 cup cornstarch: Creates a light, crispy crust when baked — a wonderful alternative to flour.
- 2 large eggs (beaten): Helps the cornstarch stick to the chicken for that perfect coating.
- 1/4 cup canola, vegetable, or coconut oil: For a quick sear that locks in moisture and flavor.
- 1/2 to 3/4 cup granulated sugar: The sweeter you go, the more delightful the sauce, so adjust to taste!
- 4 tablespoons ketchup: Adds a rich tomato tang that’s vital in the sauce’s flavor profile.
- 1/2 cup apple cider vinegar: Brings the perfect punchy acidity to balance out the sweetness.
- 1 tablespoon soy sauce: For umami depth and a hint of saltiness.
- 1 teaspoon garlic salt: Adds a subtle garlic undertone, making every bite more flavorful.
How to Make Baked Sweet and Sour Chicken Recipe
Step 1: Prep Your Oven and Chicken
Start by preheating your oven to 325 degrees Fahrenheit — this moderate temperature allows the chicken to bake gently in the sauce and soak up all the wonderful flavors without drying out. Next, cut your chicken breasts into bite-sized pieces, about 1 inch or slightly bigger, then season them lightly with salt and pepper. This simple seasoning layer prepares the chicken for the coating step.
Step 2: Coat the Chicken with Cornstarch
This is where the magic of that crispy exterior begins. Place the cornstarch in a gallon-sized resealable bag, add the chicken pieces, seal it tight, and toss gently to coat each piece evenly. This method makes sure every bit of chicken gets a perfect dusting of cornstarch, resulting in a beautiful crispness after baking.
Step 3: Dip and Sear in Egg Wash
Whisk your eggs in a shallow dish until smooth. Heat the oil in a large skillet over medium heat until it’s hot and shimmering, which is key for proper searing. Dip each cornstarch-coated chicken piece into the egg, then place it carefully into the skillet. Cook each side for 20 to 30 seconds until a gorgeous golden crust forms — remember, the chicken won’t be fully cooked yet, but we’re setting the stage for baking.
Step 4: Arrange and Layer for Baking
Once seared, place the chicken pieces in a single layer inside a 9 by 13-inch baking dish. Repeat the egg dip and sear process with the rest of the chicken, arranging all pieces in one even layer. This step ensures the sauce will evenly coat every bite during baking and that the chicken gets infused with flavor without overcrowding the pan.
Step 5: Mix and Pour the Sweet and Sour Sauce
In a medium bowl, whisk together the granulated sugar, ketchup, apple cider vinegar, soy sauce, and garlic salt until fully combined and smooth. Pour this vibrant, tangy sauce over the chicken in the baking dish, ensuring every piece gets a generous coating. Pop the dish in the oven and bake for one whole hour, turning the chicken once or twice during cooking so it’s evenly coated and deliciously sticky.
How to Serve Baked Sweet and Sour Chicken Recipe
Garnishes
Sprinkle freshly chopped green onions or finely chopped parsley over the finished chicken to add a pop of bright color and a fresh flavor contrast. Toasted sesame seeds also make an excellent garnish, adding a subtle nuttiness and crunch that pairs beautifully with the saucy chicken.
Side Dishes
This dish shines when served over piping hot, steamed white or jasmine rice to soak up all that luscious sauce. For a more colorful plate, serve it alongside sautéed bell peppers, broccoli florets, or snap peas. The vegetables add a fresh crunch and healthy balance to the meal.
Creative Ways to Present
For a fun twist, try serving the chicken in lettuce cups for a lighter, hand-held option. You can also turn it into a hearty bowl with rice, steamed veggies, and a drizzle of extra sauce or sriracha for a spicy kick. Another idea is layering it over fried rice or even stuffing it inside warm pita pockets for a fusion-style lunch.
Make Ahead and Storage
Storing Leftovers
Leftover baked sweet and sour chicken keeps very well in an airtight container in the refrigerator for up to 3 days. The sauce may thicken as it cools, so a quick stir and gentle reheating will bring it back to its perfect consistency.
Freezing
You can freeze the cooked chicken with sauce in a freezer-safe container or zippered bag for up to 2 months. Thaw it overnight in the fridge before reheating to maintain the best texture and flavor while keeping the sauce deliciously balanced.
Reheating
Reheat leftovers gently in a covered skillet over medium-low heat or in a microwave-safe dish, stirring occasionally. Adding a splash of water or broth can help loosen the sauce if it’s thickened too much during storage. Avoid reheating on very high heat to keep the chicken tender and juicy.
FAQs
Can I use chicken thighs instead of breasts?
Absolutely! Boneless, skinless chicken thighs are a great alternative and tend to be a bit juicier and more flavorful. Just cut them into similar-sized pieces and follow the same steps.
Is there a way to make this recipe gluten-free?
Yes! Simply substitute the soy sauce with gluten-free tamari or coconut aminos and ensure your cornstarch is pure. The rest of the ingredients are naturally gluten-free, making this a friendly option for those with gluten sensitivities.
Can I prepare the sauce ahead of time?
Definitely. The sauce can be mixed and stored in the refrigerator for up to 2 days before cooking. This makes assembly super quick when you’re ready to bake the chicken.
Why is the chicken only partially cooked before baking?
Searing the chicken briefly locks in moisture and creates a crisp crust, while baking finishes cooking it through and allows the sauce to fully infuse the pieces with flavor. It’s a two-step technique that yields the perfect texture.
What’s the best rice to serve with this dish?
Jasmine or long-grain white rice are excellent choices because they have a fluffy texture and mild flavor that complements the bold sauce without overpowering it.
Final Thoughts
This Baked Sweet and Sour Chicken Recipe is a total winner in my book, combining nostalgic flavors with an easy, healthier cooking approach you’ll want to make again and again. It’s perfect for busy weeknights or casual weekends when you want comfort food without the fuss. Go ahead and give it a try — I promise it’ll quickly become one of your favorite go-to meals!
Print
Baked Sweet and Sour Chicken Recipe
- Prep Time: 60 minutes
- Cook Time: 60 minutes
- Total Time: 2 hours
- Yield: 6 servings
- Category: Main Course
- Method: Baking
- Cuisine: American-Chinese
Description
This Baked Sweet and Sour Chicken recipe offers a delightful balance of tangy and sweet flavors, combined with tender chicken pieces coated in a crispy cornstarch crust. The chicken is lightly pan-fried before being baked in a flavorful homemade sweet and sour sauce, resulting in a hearty, comforting dish perfect for family dinners.
Ingredients
Chicken
- 3–4 boneless, skinless chicken breasts (about 2 pounds)
- Salt and pepper, to taste
- 1 cup cornstarch
- 2 large eggs, beaten
- 1/4 cup canola oil, vegetable oil, or coconut oil
Sweet and Sour Sauce
- 1/2 to 3/4 cup granulated sugar (adjust for sweetness preference)
- 4 tablespoons ketchup
- 1/2 cup apple cider vinegar
- 1 tablespoon soy sauce
- 1 teaspoon garlic salt
Instructions
- Preheat Oven: Preheat your oven to 325 degrees Fahrenheit to prepare for baking the chicken later.
- Prepare Chicken: Cut the chicken breasts into 1-inch or slightly larger pieces. Lightly season them with salt and pepper. Place the cornstarch in a large gallon-sized ziplock bag, add the chicken pieces, seal the bag, and toss gently to evenly coat the chicken in cornstarch.
- Heat Oil and Dip Chicken: Whisk the eggs in a shallow dish. Heat the oil in a large skillet over medium heat until very hot and rippling. Dip each cornstarch-coated chicken piece into the beaten eggs, ensuring a thorough coating.
- Pan-Fry Chicken: Carefully place the egg-coated chicken pieces in a single layer in the hot skillet. Cook each side for 20-30 seconds until the crust turns golden, but the chicken is not fully cooked through. Maintain a hot oil temperature for crispiness.
- Arrange Chicken for Baking: Remove the partially cooked chicken from the skillet and arrange them in a single layer in a 9×13-inch baking dish. Repeat the frying process with remaining chicken pieces and add them to the dish.
- Make and Pour Sauce: In a medium bowl, mix together the sugar, ketchup, apple cider vinegar, soy sauce, and garlic salt to create the sweet and sour sauce. Pour this sauce evenly over the chicken pieces in the baking dish.
- Bake Chicken: Place the baking dish in the preheated oven and bake for one hour. During baking, turn the chicken pieces once or twice to coat them evenly in the sauce, ensuring thorough flavor infusion and even cooking.
- Serve: Once baked and nicely coated with sauce, serve the sweet and sour chicken hot over steamed rice for a delicious meal.
Notes
- The amount of sugar in the sauce can be adjusted based on your preference for sweetness.
- Using apple cider vinegar adds a mild tangy flavor; you can substitute with white vinegar if needed.
- Make sure the oil is very hot before frying the chicken to get a crispy coating without fully cooking the chicken.
- Turning the chicken during baking helps it absorb the sauce evenly and prevents it from drying out.
- Serve immediately with steamed rice or your favorite side dishes for a complete meal.


