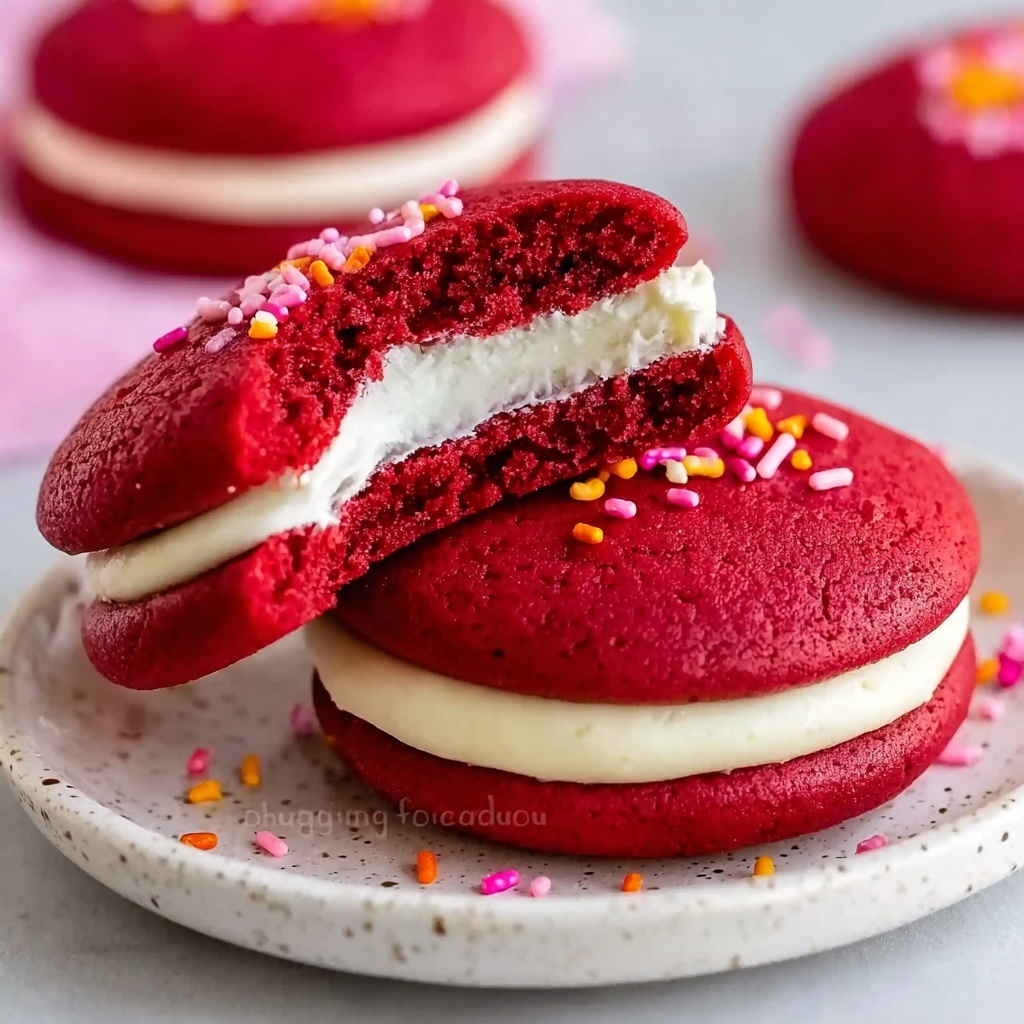
If you love a dessert that’s as charming as it is scrumptious, the Red Velvet Whoopie Pies Recipe is about to become your new favorite. These soft, cake-like cookies sandwich a lush cream cheese filling, creating a perfect balance of rich red velvet flavors and creamy sweetness. Whether you’re craving a nostalgic treat or looking to impress guests with a homemade delight, this recipe offers a fun and easy way to bake a classic with a twist. The vibrant red color and melt-in-your-mouth texture will have everyone coming back for more.
Ingredients You’ll Need
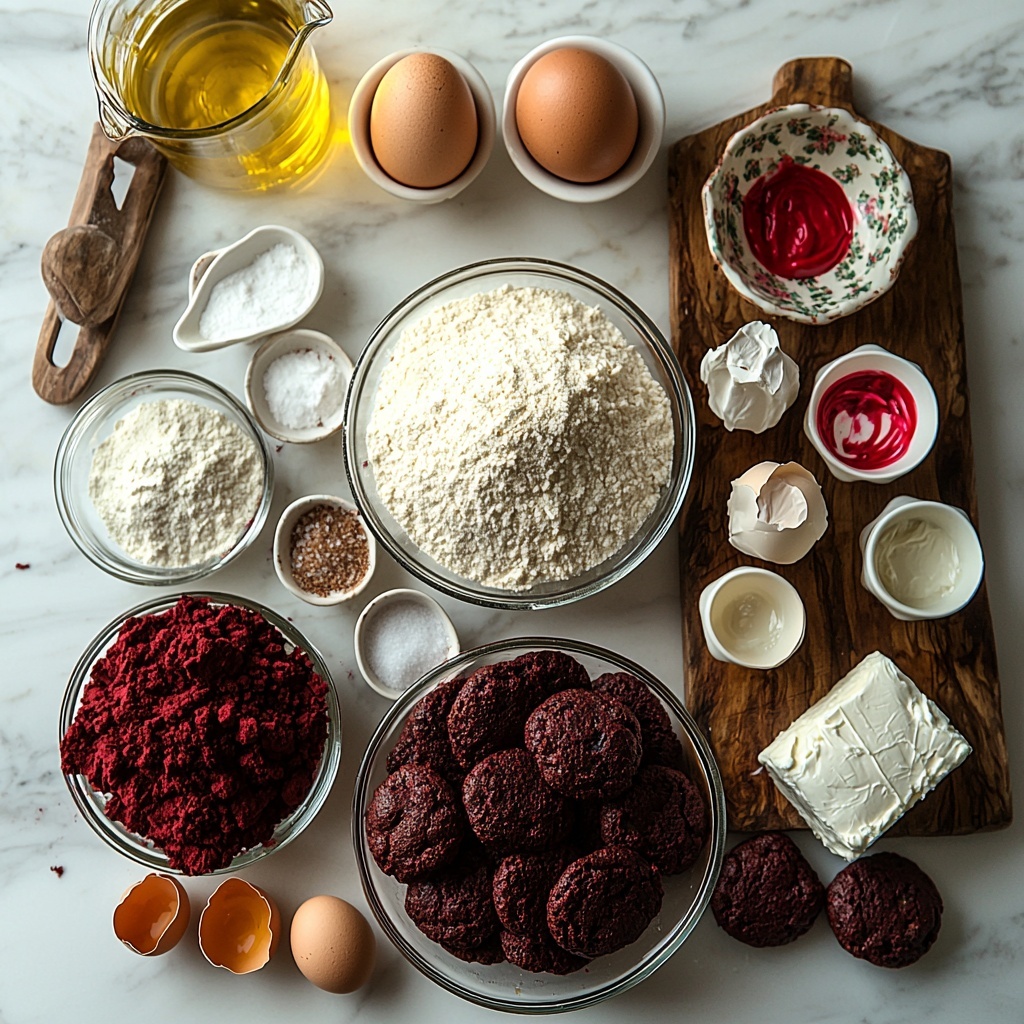
Gathering a few simple and approachable ingredients is all it takes to whip up these delightful Red Velvet Whoopie Pies. Each component plays a vital role in crafting their irresistible taste and moist texture, while the red food coloring gives them that iconic and eye-catching hue.
- 2 cups all-purpose flour: Provides the structure and tender crumb essential in whoopie pies.
- 1/2 cup cocoa powder: Adds a subtle chocolate undertone that balances the red velvet flavor.
- 1 cup granulated sugar: Sweetens the batter perfectly without overpowering the cocoa.
- 1 tsp baking soda: Helps the cakes rise and become light and fluffy.
- 1 tsp baking powder: Works with the baking soda for just the right lift and texture.
- 1/4 tsp salt: Enhances all the flavors for a richer taste experience.
- 3/4 cup vegetable oil: Keeps the whoopie pies moist and tender without heaviness.
- 1 cup buttermilk: Adds tanginess and keeps the texture soft and tender.
- 2 large eggs: Bind the ingredients together and boost the richness.
- 2 tbsp red food coloring: Creates the classic bold red velvet color that makes these pies so special.
- 8 oz cream cheese: The star ingredient in the filling, offering creamy and tangy goodness.
- 2 cups powdered sugar: Sweetens and thickens the cream cheese filling for perfect spreadability.
How to Make Red Velvet Whoopie Pies Recipe
Step 1: Prep and Preheat
Start by preheating your oven to 350°F (175°C) and lining baking sheets with parchment paper. This ensures easy cleanup and prevents the cookies from sticking, setting the stage for flawless whoopie pies.
Step 2: Mix Dry Ingredients
In a medium bowl, whisk together the all-purpose flour, cocoa powder, baking soda, baking powder, and salt. Blending these dry ingredients ahead ensures an even distribution of flavors and leavening agents for an even rise.
Step 3: Combine Wet Ingredients
In a separate bowl, beat the granulated sugar with vegetable oil until well combined. Next, add the eggs one at a time, followed by the buttermilk and red food coloring. This mixture becomes the foundation for the moistness and vivid color that make these whoopie pies shine.
Step 4: Bring It All Together
Gradually fold the dry ingredients into the wet mixture until just incorporated. Avoid overmixing to keep the batter light and airy, which translates into tender, fluffy whoopie pies.
Step 5: Shape the Pies
Drop rounded tablespoons of batter onto the prepared baking sheets, spacing them about two inches apart as they will spread slightly during baking. This helps them bake evenly and gives you perfectly sized whoopie pies.
Step 6: Baking and Cooling
Bake for 10 to 12 minutes, or until the tops spring back when lightly touched. Once out of the oven, let the cookies cool completely on a wire rack before filling to prevent the cream cheese filling from melting.
Step 7: Prepare the Cream Cheese Filling
While the cakes cool, beat the cream cheese with powdered sugar until smooth and creamy. This luscious filling is the perfect companion to the subtly chocolatey, velvety cakes.
Step 8: Assemble Your Whoopie Pies
Spread a generous dollop of cream cheese filling on the flat side of one cake, then sandwich it with another. Press gently so the filling reaches the edges, creating a beautiful, indulgent treat.
How to Serve Red Velvet Whoopie Pies Recipe
Garnishes
For an extra touch of fun and presentation, sprinkle some red or white sanding sugar on top, or dust with a light sprinkle of cocoa powder. You can even add a small fresh raspberry for color contrast. These simple garnishes elevate the classic Red Velvet Whoopie Pies Recipe into a feast for the eyes as well as the taste buds.
Side Dishes
These whoopie pies pair wonderfully with a scoop of vanilla ice cream or a cup of hot coffee or tea. A glass of cold milk is also a classic, comforting choice that complements the sweetness and creamy filling perfectly.
Creative Ways to Present
Display your whoopie pies on a decorative plate or tiered stand to highlight their charm. For parties, wrap each pie in parchment tied with a festive ribbon to give as adorable edible favors. You can also use different colored fillings or add a hint of vanilla or orange zest to the cream cheese filling for some delightful twists.
Make Ahead and Storage
Storing Leftovers
You can store your assembled Red Velvet Whoopie Pies in an airtight container in the refrigerator for up to 3 days. Keeping them chilled keeps the cream cheese filling fresh and the cakes soft.
Freezing
To freeze, separate the baked whoopie pie cakes and freeze them on a sheet before sandwiching with filling. Once frozen, you can layer them between parchment paper in a sealed container for up to 2 months. Defrost completely in the fridge before filling or serving.
Reheating
If you prefer to enjoy them slightly warm, microwave assembled whoopie pies for about 10 seconds on low power. This softens the cakes slightly without melting the creamy filling, giving you a cozy, fresh-from-the-oven experience.
FAQs
Can I make Red Velvet Whoopie Pies without food coloring?
Yes, you can omit the red food coloring, but the pies won’t have the classic bright red look. The flavor will still be there, thanks to the cocoa and other ingredients, but the color is part of the signature appeal of this dessert.
Is cream cheese the best filling option for whoopie pies?
Cream cheese filling is traditional and gives a lovely tangy contrast to the sweet cakes. However, you can experiment with marshmallow fluff, buttercream, or even chocolate ganache if you want to switch things up.
What if I don’t have buttermilk on hand?
You can easily make a buttermilk substitute by adding 1 tablespoon of lemon juice or white vinegar to 1 cup of milk. Let it sit for 5 minutes before using. This acidity helps tenderize the batter and adds flavor.
Can I use a different oil instead of vegetable oil?
Absolutely! Light-flavored oils like canola or sunflower oil work well. Avoid strong-flavored oils like olive oil, as they can interfere with the delicate red velvet taste.
How can I make the Red Velvet Whoopie Pies Recipe vegan?
To veganize this recipe, substitute eggs with flax eggs (1 tbsp ground flaxseed plus 3 tbsp water per egg), use plant-based milk mixed with vinegar for buttermilk, replace cream cheese with vegan cream cheese, and choose vegan-friendly sugar and cocoa powder.
Final Thoughts
There’s something truly special about the Red Velvet Whoopie Pies Recipe that makes it a delightful project and a guaranteed crowd-pleaser. From the moment you see that vibrant red batter to the first bite of the creamy, tangy filling, you’ll understand why this treat has stood the test of time. So roll up your sleeves, gather those simple ingredients, and treat yourself and your loved ones to these fabulous whoopie pies. Trust me, once you try them, they’ll become a heartfelt favorite in your dessert rotation.
Print
Red Velvet Whoopie Pies Recipe
- Prep Time: 15 minutes
- Cook Time: 12 minutes
- Total Time: 32 minutes
- Yield: 12 servings
- Category: Dessert
- Method: Baking
- Cuisine: American
- Diet: Vegetarian
Description
Delight in these classic Red Velvet Whoopie Pies featuring soft, cocoa-infused cakes paired with a creamy, tangy cream cheese filling. Perfectly baked to tender perfection, these sweet treats are delightful for parties, desserts, or an indulgent snack.
Ingredients
Cake Batter
- 2 cups all-purpose flour
- 1/2 cup cocoa powder
- 1 cup granulated sugar
- 1 tsp baking soda
- 1 tsp baking powder
- 1/4 tsp salt
- 3/4 cup vegetable oil
- 1 cup buttermilk
- 2 large eggs
- 2 tbsp red food coloring
Cream Cheese Filling
- 8 oz cream cheese, softened
- 2 cups powdered sugar
Instructions
- Preheat Oven: Preheat your oven to 350°F (175°C) and line baking sheets with parchment paper to prepare for baking the whoopie pies.
- Mix Dry Ingredients: In a medium bowl, whisk together the all-purpose flour, cocoa powder, baking soda, baking powder, and salt until evenly combined for a smooth blend.
- Combine Wet Ingredients: In a separate large bowl, mix the granulated sugar and vegetable oil until well incorporated. Then add the eggs one at a time, mixing thoroughly after each addition. Stir in the buttermilk and red food coloring to create the batter’s vibrant color.
- Combine Wet and Dry: Gradually add the dry ingredient mixture into the wet ingredients, stirring just until incorporated to avoid overmixing which can toughen the texture.
- Form the Cakes: Drop rounded tablespoons of batter onto the prepared baking sheets, spacing them about two inches apart to allow for spreading during baking.
- Bake: Bake the cakes in the preheated oven for 10 to 12 minutes, or until they spring back when gently touched, indicating they are cooked through.
- Cool Completely: Remove the cakes from the oven and transfer them to a wire rack to cool completely before assembling the whoopie pies.
- Prepare Filling: Beat the softened cream cheese and powdered sugar together until smooth and creamy to create the luscious filling.
- Assemble Whoopie Pies: Spread or pipe a generous amount of cream cheese filling onto the flat side of one cake, then sandwich with another cake to form a whoopie pie. Repeat until all cakes are filled.
Notes
- Ensure the cakes are fully cooled before filling to prevent the cream cheese mixture from melting.
- For a more intense red color, adjust the food coloring quantity as desired.
- You can substitute buttermilk with milk plus 1 tablespoon of vinegar or lemon juice as a homemade alternative.
- Store assembled whoopie pies in an airtight container in the refrigerator for up to 3 days.
- Allow refrigerated pies to come to room temperature before serving for optimal taste and texture.


